
Get the e-Book
Come into the garden and find some twigs - then, let's build! They can be rugged and rough, or more refined and smooth.
Whatever they look like, there's a craft for that.
- Home
- Hypertufa Projects
- Hypertufa Hands
Hypertufa Hands
Rustic Garden Art DIY
Making funky and fun garden art is a knack. I'm always finding things that can be taken to the next level, or designing something from scratch.

There are lots of ways that the hypertufa hands can be displayed, depending on what you use to form them.
These are either draped over a round item such as a bottle, or formed and left to harden inside a plastic plant pot.
Because I save everything, I have a lot of choices, from plastic containers like yogurt or cottage cheese containers, to clay pots.
This is one time that being a hoarder pays off.
 A tiny Sempervivum peeks out...
As they weather, the moss will grow in the crevices, and eventually, in time, lichen could be happy there too.
These don't need any special winter care, except to keep them dry if possible.
There is nowhere for water to collect, which could freeze and crack, but they could break if they are immersed in water.
 A Pair of Hypertufa Hands
Think whimsy; display them in a small terracotta pot, with a handful of plants like a bouquet, or group them in a tray.

The original hypertufa hand - where it all started. This one catches the imagination and gets everyone fired up!
 The Original Hypertufa Hand
How To Make Fingernails On Hypertufa Hands
Although none of my 'hands' have fingernails, it's something I've been asked about how to do, so here's what I would try.
Using thin cardboard, similar to greeting card weight, cut out some shapes similar to the picture.
You'll need different sizes for each finger, starting with the largest ones for the thumb, graduating to smaller ones for the other fingers, and a tiny one for the little finger.

You'll need five for each hypertufa hand you make. Carefully dab a bit of glue on one side of each one, and insert it into the fingers of the glove. Stick it onto the end of the finger, on the correct side, inside the glove.
Make sure not to get glue all inside the finger!
Once the glue is dry, put the hypertufa mix in, and then put the whole thing into the mold to set the shape of it, curled like a real hand.
When you peel the gloves off, the shape of the cardboard finger nail will be impressed into the hypertufa.
If the cardboard sticks, leave it in water for a while (which you'll need to do anyway to cure it) so it soaks off.
I made several of these hypertufa hands, and displayed them as a group. They're planted with several different kinds of tiny species of Sempervivum.
 Top View of a Handful of Hypertufa Hands
The Semps love well drained soil, and in this case, the water just runs out.
 The view of the Hypertufa Hands from the side
Make your own, and see what happens!
You might like these
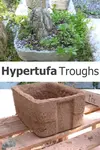
Hypertufa Troughs; a tiny mountain side in miniature
Hypertufa Troughs are a rustic and rugged way to make a mountainside garden in miniature; alpine plants, succulents and tiny trees all thrive in the microcosm
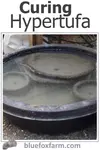
Curing Hypertufa; crucial steps for a long lived project
How to Cure Hypertufa correctly; give your project the best chance of surviving frost, rough handling, use and abuse; tips to properly curing your project...
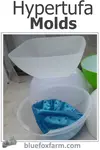
Hypertufa Molds; use these to make unique hypertufa creations
How to choose Hypertufa Molds; they can be as simple as a piece of drycleaners poly film, or as complex as a salvaged basket
If you're curious how broken pots, twigs and wire combine into magic, let's explore creativity in action.
Fill in the form below for your copy;
(Don't be disappointed - use an email address that will accept the free download - some .aol email addresses won't.
If you don't see your download within a few minutes, try again with another email address - sorry for the bother.)


Popular Posts You Can't Miss


Woman of Many Sticks - find out why I'm called that...
Join my e-mail group;
Sign up for the Rurality Newsletter here: (click on the bucket!)

Blue Fox Farm Home | About Me | Contact Me | Site Map | Privacy Policy | Copyright
Copyright © 2002- BlueFoxFarm.com All rights reserved

We acknowledge the traditional owners and custodians of the lands on which we live and work and pay our respects to elders past, present and future. Our business is created on the Mi’kmaq lands we call Epekwitk.