- Home
- Rustic Paint Techniques
- Barnboard Painted Footstool
Jacki Cammidge is a Certified Horticulturist and rustic garden artisan with 30+ years creating twig trellises, archways, and hypertufa pieces from natural materials.
Barnboard Painted Footstool
Can't Have the Real Thing? Paint it!
I came in from outside and accused hubby of holding out on me. I found a really cute little plywood stool, obviously one of those shop projects from high school.

Time for it to go to the next level, and get painted. I decided that as it was quite rugged and already damaged, it makes the perfect candidate for either faux driftwood, fake barnboard, or camouflage.
I settled on painting it like barnboard, because if you look closely, it's got one of those shaped pieces where they mended the plywood as it was being made.
These, painted like a knot hole, give it lots of character, and make a 3-D effect.
 The footstool, ready for it's makeover - look for things like this in flea markets, thrift stores or garage sales
I dug out the box of paints from under my bed, and shook them to see if they were still liquid - I usually replace them annually or sooner, because they solidify.
Some had chunks in, but for this project, no problem. That will just add contouring!
 Selection of paints for the Barnboard Painted Footstool - doesn't matter if they're not perfect
The plywood footstool needed a good cleaning to get the dust off, but other than that, no special treatment.
If you want to get it cleaner, you could use TSP on your project, which takes off grease or oil.
 The first coat and subsequent coats just keep adding layers
The first coat was just a scribble of colour randomly applied with a larger brush to give it some depth and background.
Then other layers were added with each one using a smaller sized brush.
In some cases, I would sand between layers, but as this project had kind of a rough finish, no need for this step.
 The second coat keeps layering on the rustic
This project didn't get any kind of finish applied over top, but you could if you wanted, layer on some urethane (I use water based only).
I find that these acrylic craft paints are incredibly durable, and don't need to be protected from any wear unless it's outdoors.
 The finished barnboard painted footstool, ready to use
Let it dry, only a few minutes to an hour, depending on how thickly you've applied the paint, and it's ready to use.
Hubby calls this a toe stubber. Serves him right for holding out on me.
Update; we've used this stool for years, up until the time we moved all the way across the country and decided to let it go.
It was small enough to fit in the back seat of many of the trucks we owned in the interim, and allowed me to climb in without a lot of help.
I'm hoping someone else is getting the same kind of value from it, to help them reach higher shelves, maybe, or for a child to use for a seat. You could even use it to teach your dog some parkour moves, like up-up, or to learn back end awareness.
There is no end of usefulness for a footstool like this, so if you see one, grab it. Don't let the naysayers deny you the opportunity.
You might like these
Punched Tin Lamp Shades; from simplicity to gorgeous in minutes
Add some charm and character to your porch, an old rustic shed or even in your house with a Punched Tin Lamp Shade
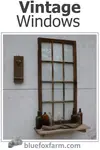
Vintage Windows; repurposing old windows for garden crafts
Use your old Vintage Windows for refurbishing into some unique and unusual garden crafts; plant them with succulents or make a tiny rustic greenhouse to display ferns or violets in...
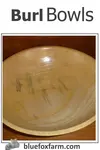
Burl Bowls - reveal the beauty within
Reveal the beauty within the burl with a Burl Bowl; nature seldom makes a mistake, and there is always a silver lining...

 Jacki Cammidge
AUTHOR BIO
Jacki Cammidge is a Certified Horticulturist with a diploma in Ornamental Horticulture and the rustic garden artisan behind Woman of Many Sticks. Over 30+ years, she built custom twig trellises, archways, clematis gazebos, and 100+ hypertufa pieces using natural materials and upcycled finds. See her work on Facebook and Pinterest. Now retired, she still loves growing and harvesting willow.
If you're curious how broken pots, twigs and wire combine into magic, let's explore creativity in action.
Fill in the form below for your copy;
(Don't be disappointed - use an email address that will accept the free download - some .aol email addresses won't.
If you don't see your download within a few minutes, try again with another email address - sorry for the bother.)


Popular Posts You Can't Miss


Woman of Many Sticks - find out why I'm called that...
Join my e-mail group;
Sign up for the Rurality Newsletter here: (click on the bucket!)

Blue Fox Farm Home | About Me | Contact Me | Site Map | Privacy Policy | Copyright
Copyright © 2002- BlueFoxFarm.com All rights reserved

We acknowledge the traditional owners and custodians of the lands on which we live and work and pay our respects to elders past, present and future. Our business is created on the Mi’kmaq lands we call Epekwitk.