- Home
- Rustic Country Garden Decor
- Shabby Corbels
Jacki Cammidge is a Certified Horticulturist and rustic garden artisan with 30+ years creating twig trellises, archways, and hypertufa pieces from natural materials.
Shabby Corbels
to Hold up the Rustic Mantel
Jacki Cammidge, The Woman of Many Sticks, is a participant in the Amazon Services LLC Associates Program, an affiliate advertising program designed to provide a means for sites to earn advertising fees by advertising and linking to amazon.com. The cost to you, if you purchase something through my link, is the same.
I don't have a fireplace, but I do have a woodstove - why shouldn't I have a mantel to decorate?

These shabby corbels are the perfect accent for a rustic mantel made of weathered wood.
But what if your wood isn't already shabby? That's okay - I'll show you how to make them look aged and chippy, looking just like you just salvaged them off an old building.
So, what are corbels, anyway?
Answer: They perform the same function as a shelf bracket, but they're much bigger and usually fairly chunky.
They're great supports for the hanging over section of a farmhouse island, or even to hold plank shelves in your kitchen, on a porch or wherever you want to make a statement.
The 'shabby' part is where you distress and age your pieces. Here I've put my favorite stain (ie: weathered and aged them with vinegar and steel wool) and then painted them with my very own chalk paint, which is then worn off the high spots, just as it would be in a real vintage piece.

The shapes of each corbel were cut first of all on a bandsaw to get the rough shape (designed by me and cut out of cardboard and traced onto one two x eight piece and two one by eight pieces for each).

After fiddling with this quite a bit, and cutting each piece with the jig saw for the curves, we decided it would be easier (next time) to glue blanks together and cut them all in one piece. Still figuring that out.
For now, it's a lot of filing to get all the pieces to match (somewhat).

Two turned pieces of wood for a decorative spindle effect were located in the greenhouse where all the bits of salvage end up. I'll pre-drill, glue and screw these in next.
Glue
What kind of glue, you ask? Well, as these are wood, the best kind is carpenters glue, designed for sticking wooden pieces together, permanently. Make sure they are in exactly the right place before clamping.

Then comes the fun part; the chalk paint. I developed this after doing my research and being cheap as I am, decided to try using the bits of leftover paint and drywall mud that were lying around.
The first coat has a few drops of black acrylic craft paint in for a grey tint, the top coat is simply white, then sanded to reveal the darker colors in the worn spots.
It's important not to get too 'precious' with this step - drips, thick spots, uneven - it's all good, and part of the look.

In the end, these corbels have pride of place on the outside of the Breezeway Studio, so I can use the shelf for photo ops!
Later; one thing that I wouldn't do again is use the vinegar and steel wool stain with this particular wood which was already stained with an oil base stain from Sikkens. Only use that technique on bare wood; I like the shabby look, but this makes it just look dirty instead. It's a learning curve that never ends.
You might like these
Punched Tin Lamp Shades; from simplicity to gorgeous in minutes
Add some charm and character to your porch, an old rustic shed or even in your house with a Punched Tin Lamp Shade
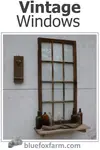
Vintage Windows; repurposing old windows for garden crafts
Use your old Vintage Windows for refurbishing into some unique and unusual garden crafts; plant them with succulents or make a tiny rustic greenhouse to display ferns or violets in...
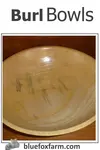
Burl Bowls - reveal the beauty within
Reveal the beauty within the burl with a Burl Bowl; nature seldom makes a mistake, and there is always a silver lining...

 Jacki Cammidge
AUTHOR BIO
Jacki Cammidge is a Certified Horticulturist with a diploma in Ornamental Horticulture and the rustic garden artisan behind Woman of Many Sticks. Over 30+ years, she built custom twig trellises, archways, clematis gazebos, and 100+ hypertufa pieces using natural materials and upcycled finds. See her work on Facebook and Pinterest. Now retired, she still loves growing and harvesting willow.
If you're curious how broken pots, twigs and wire combine into magic, let's explore creativity in action.
Fill in the form below for your copy;
(Don't be disappointed - use an email address that will accept the free download - some .aol email addresses won't.
If you don't see your download within a few minutes, try again with another email address - sorry for the bother.)


Popular Posts You Can't Miss


Woman of Many Sticks - find out why I'm called that...
Join my e-mail group;
Sign up for the Rurality Newsletter here: (click on the bucket!)

Blue Fox Farm Home | About Me | Contact Me | Site Map | Privacy Policy | Copyright
Copyright © 2002- BlueFoxFarm.com All rights reserved

We acknowledge the traditional owners and custodians of the lands on which we live and work and pay our respects to elders past, present and future. Our business is created on the Mi’kmaq lands we call Epekwitk.